FREE Delivery Over £99*

Discreet Packaging

Best Price Guaranteed

Pay In Instalments

Safe & Secure Checkout

Chat to an Expert

FREE Delivery Over £99*

  • FREE Delivery Over £99*

  • Discreet Packaging

  • Best Price Guaranteed

  • Pay In Instalments

  • Safe & Secure Checkout

  • Chat to an Expert

Hyjo Team

Tips from a Pro: Maximising your Light Source

Maximising Your Light Source: Tips From A Pro

Every grower at some point has asked the question “How close do I keep the light to my plant?”. While it is true the closer you can get it the bigger the yield will be, there is one very important consideration, the heat. Any mounted light that is simply too close to the plant can cause the flowers and the leaves to dry significantly, at worst, to the point of burning.

The Importance Of Temperature

The arena of temperature we most need to keep an eye on is between the top of the plant and the lamp. Now many of us will have wall fans installed targeting such areas, some of us may even be hanging hydrometers from lights to monitor temperatures and keep an eye out for hotspots. Generally speaking, this space between the light and the plant should be no hotter than 2 degrees warmer than the surrounding room.

Best Distance For Hanging Lights

The ideal distance to hang the light is 300mm or 0.3m from the top of the plant. However, this is entirely conditional on the temperature. This can only be done if the temperature is within the range you desire. For more customisation and variability to your setup, Digital dimmable ballasts are a good investment. It is pretty standard to be able to dim between 250 400 600 and 660w.

How To Measure Light Intensity

The equation used to measure light intensity is the “inverse square law”. Once you get this down, you can work out how to get the most from a light source. Inverse Square law goes something like this:

I = 1/D2

Light intensity (I) = 1 divided by the distance from the lamp squared (D2).

So let’s give the equation a try with a distance of 0.3m.


Example 1

I = 1 / 0.3x0.3

0.3 x 0.3 = 0.09

1 / 0.09 = 111 so the light intensity is 111 = 100% this equation proves that with a distance of 300mm from light to plant 100% is being absorbed by the plant.

Let’s do it again this time with a distance of 600mm or 0.6m.


Example 2

I = 1 / 0.6x0.6

0.6 x 0.6 = 0.36

1 / 0.36 = 2.7 this gives us a light intensity of 27% so by doubling the distance between the light and the plant we have lost 73% of the light intensity.


Finally, Remember…

Just because you grow with a 600w lamp doesn’t mean that 600w is being transferred to the plant. If due to excess heat, you are mounting the light 600mm from the top of the plant then you are only transferring around 200w. This is why dimmable ballasts are useful as you can choose to dim down to 400w, meaning, you can mount the light closer to the plant allowing for better light intensity absorption.

It wasn’t long ago I explained the inverse square law to a friend of mine who’d been growing as much as I had. At the time, he was using 1000w HPS lighting for flowering, hanging them 1m above the plant. A bet was made that I could produce a greater yield with 2x 400w HPS lights. He seemed pretty amused at the idea till I later won the bet. As I could mount both the 400w lamps closer to the plant, it could transfer more light and increase the yield.

pH Levels Explained: Vital Info for Soil, Nutrient and Plant Growth

ph-levels-explained-vital-info-for-soil-nutrient-and-plant-growth

pH Levels Explained

When we talk about gardening or hydroponics, we often emphasise nutrients, light and water quality, but there's another key player that deserves our attention – pH. As someone who has spent years wading through the intricacies of horticulture with the Hyjo team, I can attest to how the pH level can make or break your plant's health. Simply put, pH is a measure of the acidity or alkalinity of a solution, indicated by a numeric scale that runs from 0 to 14. Pure water sits smack in the middle at 7, representing neutrality. Anything below 7 is acidic, while numbers above tilt towards alkaline or basic.

Understanding this seemingly tiny detail is crucial because each plant thrives in a certain pH range. It can affect everything from soil chemistry to nutrient availability. For instance, a high hydrogen ion concentration in acidic soils can hinder plants from accessing nitrogen, phosphorus, and potassium. Conversely, alkaline soils can limit the uptake of iron, manganese, and copper. Armed with a trusty pH meter, gardeners can gauge their growing medium's status and make necessary adjustments to optimise growth.

I'll walk you through what exactly impacts the shifting sands of your growing medium's pH and unpack how to manoeuvre through varying soil types - be it neutral, acidic, or alkaline. So whether you're wrestling with the pH range for coco media or navigating the waters of recirculating deep water culture systems, by the end of this, you'll be well-versed in tweaking your soil pH like a seasoned pro. 

Key Takeaways

  • pH measures the acidity or alkalinity of a solution on a scale from 0 to 14.
  • Proper pH levels are crucial for nutrient availability and overall plant health.
  • Understanding and adjusting soil pH is key to successful gardening and hydroponics.

What Is pH?

Have you ever wondered why some substances are sour to the taste like lemon juice, while others like baking soda have a completely different profile? Well, the answer often lies in a little thing we call pH. But what exactly is it?

pH stands for 'power of hydrogen' and is, quite simply, a measure of the hydrogen ion concentration in aqueous solutions. I think of pH as a covert agent working behind the scenes; its value can tell you if a solution is acidic, neutral, or alkaline. The term was first introduced by a Danish biochemist named Søren Peter Lauritz Sørensen.

The nitty-gritty of pH is more mathematical—it's the negative logarithm to the base 10 of the hydrogen ion concentration. This might sound a bit daunting, but it's a pretty straightforward concept. Solutions with more hydrogen ions are acidic, and those with fewer are alkaline.

Let's talk numbers. pH is measured on a logarithmic scale from 0 to 14. A pH of 7 is considered neutral—that's where pure water sits. Anything below 7 is acidic, like lemon juice (around pH 2) and vinegar (roughly pH 3). Above 7, you've got your alkaline substances; for instance, baking soda has a pH about 9, while bleach is way up there with a pH around 13.

This simple little scale isn't the worst place to start:

pH Value Common Substance Classification
Around 2 Lemon Juice Acidic
Roughly 3 Vinegar Acidic
Exactly 7 Pure Water Neutral
About 9 Baking Soda Alkaline
Around 13 Bleach Alkaline

pH doesn't just sit in the lab; it ventures out into the real world, affecting how nutrients are available in soil and influencing microorganisms and plant health. Something as simple as rainfall or the presence of organic matter can nudge the pH of natural soils in one direction or another.

So the next time you're tending to your garden or just enjoying a glass of something fizzy, remember that pH has a role in it all, even if it's just behind the scenes.

What Changes Growing Medium pH?

When I think about the vitality of plants, I often remember that the medium they grow in is much like a home to them. It's where they sip water and nutrients. But did you know this home, the growing medium, is subject to pH changes? Let's look at what causes these shifts, so we can keep our leafy friends chirpy!

Water Alkalinity

Alkalinity, not to be confused with pH, refers to water's capability to neutralise acidic substances. When the water you use is alkaline, it comes with calcium and magnesium ions in tow. These heroes can push the growing medium’s pH up. That’s why checking water quality with pH meters can save the day by letting us know if our water is more of a hero or a villain!

Fertiliser

Now, onto fertilisers, these can be a bit of a Jekyll and Hyde situation. Depending on what you use, they can release either acidic or basic ions. If the fertiliser's the acidic sort, it’ll lower the pH of the growing medium, swinging things towards a major stress for the plant. But if it's a basic chap, it lifts the pH, possibly making the environment too cushy for some plants. That's why knowing the right mix and amount is as important as the ingredients in my legendary Victoria sponge cake.

Crop

Lastly, crops are not just idle bystanders. They play an active role, too. Some are quite the personalities, taking up ions and causing a bit of a pH jumble. For example, as they pull up nutrients, they might leave hydrogen ions behind, which lowers the pH. It turns out that certain crops are more demanding than others, setting the tone for the growing medium's pH.

So, there we have it. We've talked water, fertiliser, and crops – all key players in the pH drama of a growing medium. Keep a close eye on these factors, and you won't be caught off guard when the pH starts to sway. Remember, a happy home means a happy plant, and a happy plant means a happier you! ????

pH Range for Coco Media

Have you ever wondered why plants in coco coir flourish? Well, let's take a peek into the world of soil pH and agronomy to understand this phenomenon. As a gardener myself, I operate within 5.7 to 6.4 ph range for optimum plant growth. 

Coco coir, commonly used in horticulture, offers a unique environment for plant roots. Its natural pH range is about 5.8 to 6.5, which is slightly acidic and perfect for a diverse range of plants. If you're like me, obsessed with your plants' health, then paying attention to this aspect is crucial for nurturing a vibrant garden.

  • What's the big deal with pH?
    Essentially, pH influences the soil's biome. The range I mentioned is prime real estate for beneficial microbial activity, which aids in nutrient uptake for your plants.

  • Buffering Capacity
    Coco coir has a remarkable ability to buffer, meaning it can maintain a stable pH, even when I make minor errors in feeding. This buffering capacity ensures my plants are less likely to suffer from sudden pH fluctuations.

Isn't it great when your growing medium works with you, rather than against you? To maintain this perfect pH balance, you might sometimes need to adjust the pH level by adding buffers. I regularly check the pH of my coco coir to ensure it stays within the ideal range for optimal plant health.

Given this specific medium's propensity to lean towards acidic conditions, every once in a while, I might have to nudge it back to the ideal range with a little pH up or down. But more often than not, if I keep my irrigation water balanced, my coco media does the heavy lifting, offering my plants a hospitable environment to grow to their fullest potential. Now that’s what I call a powerful partnership between gardener and ground!

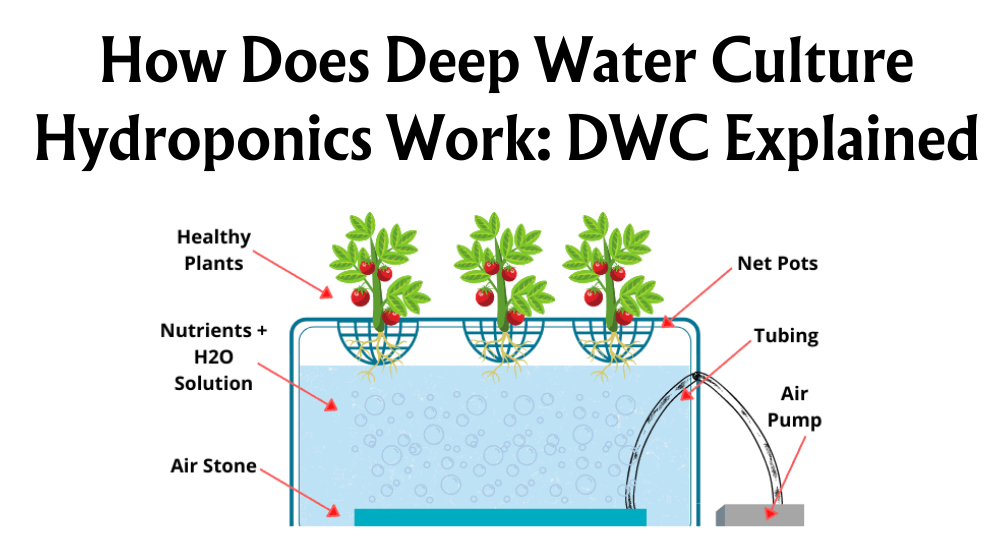
pH Range for RDCW Systems

Have you ever wondered about the secret sauce to thriving plants in a Recirculating Deep Water Culture (RDWC) system? I'll let you in on a little secret: it's all about the pH! Let's chat about why the pH range is critical for success in RDWC systems and how it links with other aspects, like water treatment and materials used for pipes, like copper.

In my experience running RDWC setups, keeping the water's pH between 5.8 and 6.2 has been the sweet spot for healthy plants. What's so magical about this range? Well, it keeps the nutrient solution in the perfect zone for optimal plant uptake.

Why this range? Plants are a bit fussy and like their environment just right. If the pH strays from our range, nutrients can either become unavailable (they effectively go into hiding) or too available (it's like a nutrient party, and everyone's invited), which causes an imbalance.

Quick Tip: A touch acidic is just perfect, mimicking the natural conditions many plants love.

Here's a nifty way to remember:

  • 5.5 is too low — nutrient lockout will show!
  • 6.5 is too high — nutrient toxicity might apply!
  • 5.8 - 6.2 is just right — plants will grow strong and bright!

When it comes to water treatment, keeping pH under control helps to guarantee the longevity of my system. It prevents the buildup of minerals that can harm my plants or clog up the works. What's more, if you're using copper pipes, it's crucial to monitor the pH and maintain it within this range to prevent corrosion. The last thing we need is copper levels rising and putting the whole crop at risk!

Now, don't just set it and forget it. Regular checks and balances are key. I tend to test my water daily, just to be on the safe side. After all, prevention is better than cure, especially in the delicate ecosystem of RDWC. Grab yourself a trustworthy pH meter – your plants will thank you!

Alkaline Soils

Have you ever wondered why some plants in your garden thrive whilst others struggle, no matter what you do? The answer could lie beneath your feet, in the pH of the soil. So, what exactly are alkaline soils? Well, they're the ones that boast a pH above 7.0, indicating a soil that's more limestone chalk than lemon juice in character. These soils are rich in calcium and magnesium, and they often come with a few quirks that I'll talk you through.

What's the deal with these soils, then? On the plus side, they hang onto nutrients like a squirrel with a prized nut - less leaching, which is good news for plants. You won't find heavy metals causing a fuss either; they're far less toxic in these conditions. But here’s a ‘but’: essential nutrients such as iron and manganese become the shy types, less soluble and, thus, less available to plants. This can lead some plants to experience chlorosis, a fancy term for a sad, yellowing condition due to inadequate chlorophyll.

Now, not all plants are wallflowers at the alkaline soil party - some are the life and soul! Take lilac, honeysuckle, clematis, and lavender; they cope with the high pH by throwing their own adaptations into the mix, allowing them to flourish where others might flounder.

And if you're dealing with alkaline soils in your garden, don't fret. I’ve got some tips to help you manage:

  • Choose Wisely: Pick plants that naturally like it on the higher side of the pH scale.
  • Add Organic Matter: This can help improve nutrient availability and overall soil structure.
  • Fertilise Smart: Utilise acid-forming fertilisers to nudge that pH down a bit.
  • Avoid Lime and Wood Ash: They’re like fuel to the alkaline fire, so steer clear if you're trying to reduce alkalinity.

Overall, it's about working with what you've got and creating a haven for plants that can handle a bit of alkaline swagger in their step. Isn't it fascinating how a little scale from zero to fourteen can have such a big impact on our green-fingered pursuits?

Neutral Soils

Ever wondered what makes a soil 'just right' for a broad range of plants? Let's talk about neutral soils. Neutral soils have a pH that hovers around the 7.0 mark, which means they offer a sweet spot where plenty of nutrients are readily available to plants.

Why does this matter, you ask? Well, in this balanced environment, nutrient availability is at its best—think of it as a buffet where all the essential elements are up for grabs. Microbial activity is bustling, breaking down organic matter and boosting soil structure, which is vital for good drainage and aeration.

But let's not get carried away; even neutral soils have their quirks. They are very democratic, allowing a diverse array of plant species to thrive. This means gardeners like us have an easier time growing beauties like roses, sunflowers, tomatoes, and beans without having to fuss over adjusting the pH too much.

However, neutrality also comes with the risk of nutrient leaching—if it's easy come, it's easy go. Plus, with such an open invitation, plants might face more competition for those nutrients.

Maintaining this balance doesn't have to be a chore. I make it a point to:

  • Test the soil pH regularly with a simple kit—I can't fix what I don't know.
  • Add organic matter because it's like giving the soil a multivitamin.
  • Choose balanced fertilizers to avoid swinging the pH pendulum too far one way or the other.
  • Steer clear of extreme pH adjustments—it's all about harmony.

In the end, it's all about keeping it steady and avoiding major swings. That way, my garden remains a happy place for a whole range of plants to call home.

Acid Soils

Ever seen a garden radiant with rhododendrons or bouncy blueberries? What you've witnessed is the spectacular results of acid soils at work. So, what exactly are these soils? Acid soils are those with a pH lower than 7.0. I like to think of pH as the personality of the soil; below 7, and it's on the acidic side. Let's get into what this means for our green-thumbed pursuits.

Characteristics of Acid Soils:

  • Low in Calcium and Magnesium: You'll find that these soils are often lacking in calcium and magnesium. It's a bit like a diet without dairy – some plants really struggle without these nutrients!
  • High Iron and Manganese Availability: Iron and manganese have a field day in acid soils. They're more soluble, so plants can guzzle them up much easier.
  • Challenging Structure: The structure might be poor, a bit like a crumbling cookie. Not the best environment for roots to thrive.

Pros and Cons for Plant Growth:

Here's the interesting bit – acid soils are something of a double-edged sword. They enhance the solubility of a few essential elements, which is brilliant! Plus, they tend to reduce disease incidence; fewer sick days for plants, yay! However, there's a catch. Acid soils can be a bit too much of a good thing – they bring toxicity into the equation, reduce microbial activity (think of microbes as the soil's workforce), and limit your plant choices quite drastically.

Plants That Love Acidic Conditions:

  • Rhododendrons
  • Camellias
  • Heathers
  • Blueberries

These botanical beauties have adapted to roll with the low pH punch. They've got survival down to a fine art, capable of thriving where others might wither.

Managing Acid Soils – My Tips for You:

  1. Choose Suitable Plants: Stick with plant pals that enjoy an acidic hangout.
  2. Lime or Dolomite Application: It's like an antacid for soil. It can help neutralise the excess acidity.
  3. Alkaline-forming Fertilisers: These are like bringing balance to a seesaw. They help to even things out.
  4. Avoid Sulfur and Peat Moss: They're the culprits when it comes to acidifying soil even further.

So, if you're blessed with this unique soil type, don't fret! I personally find acid soils fascinating, and with the right approach, you can curate a stunning garden that's both a haven for acidity-loving plants and a testament to your green-fingered skills.

Changing Your Soil pH

Ever wondered why your plants aren't thriving, even though you're giving them all the TLC they could ask for? The answer could lie just beneath your feet—in your soil pH. It's a bit like a dinner party for plants; the right pH sets the table, while the wrong one can disrupt the feast.

Testing soil pH is like a sneak peek at your garden's potential. Use a pH meter or test kit—super easy to find at your local garden centre, trust me. Knowing the current pH helps you avoid a gardening faux pas by ensuring you don't disturb the soil's acid-base balance needlessly.

If you're scratching your head wondering if you should tinker with the pH, consider these pointers. The golden rule? Only mess with the soil's pH if it's stopping your plants from grabbing their nutrients. The type of soil amendment—like lime to up the pH or sulphur to bring it down—depends on your starting point and where you want to end up. Think about dosh and effort too; plus, nobody fancies harming the environment with excess acid rain or alkalosis/acidosis situations!

Here's a rough guide to get your soil pH just right:

  • To raise pH: A sprinkle of lime can work wonders. Picture this: tossing 5 kg of lime over a 100 m² garden could lift your pH by 0.5!
  • To lower pH: A dash of elemental sulphur might be your new best friend.

You wouldn't pour salt without tasting your food first, would you? The same goes for soil amendments—small doses and a bit of patience do the trick. Keep an eagle eye on the pH over time, you don't want to tip your soil into a drama of over-liming or -sulfuring.

It may feel like a chemistry class but adjusting soil pH is really just gardening with a sprinkle of science. Now, go and get that pH 'just right' and watch your garden party bloom!

Conclusion

I've touched on several facets of pH in our daily lives, underlining its critical role. From the way plants absorb nutrients to the digestive process in our stomachs, it’s clear that the optimal pH level is key to health and functionality. Particularly for garden enthusiasts, understanding soil pH can be the difference between a thriving garden and a failing one.

Here's what I want you to remember:

  • Soil pH is vital for plant growth. A balanced pH can improve nutrient availability and enhance microbial activity.
  • Digestive system: Our stomachs rely on an acidic environment to break down food and ward off pathogens.

Practical steps for you:

  1. Test your soil's pH: This is a simple yet impactful way to ensure your plants receive the best care.
  2. Adjust pH accordingly: If your soil is too acidic or alkaline, it might be time to consider amendments like lime or sulfur.

I encourage you, especially if you love gardening, to roll up your sleeves and test your soil's pH. It's a small step that could lead to healthier, more vibrant plants. Who wouldn't feel a burst of pride looking at a lush, green garden that bears the fruits of their labour? Remember, your garden's success begins with understanding the foundation it’s built on—literally.

pH Levels Explained FAQs

What roles does pH play in maintaining human health?
Maintaining a balanced pH level in the human body is crucial. For instance, our blood needs to stay at a slightly alkaline pH of about 7.4. If it tips out of this narrow range, it can disrupt bodily functions, leading to various health issues.
How does pH affect chemical processes within the field of chemistry?
pH is a fundamental factor in chemical reactions. It can influence reaction rates, the solubility of compounds, and the colour changes in indicators. A chemist tweaking the pH can significantly alter the course of a reaction or the properties of the substances produced.
In what ways is pH critical to the quality and preservation of food?
You’d be surprised how much pH can affect food! It's key for controlling bacterial growth, with high acidity often used to preserve food. Moreover, pH affects the flavour, texture, and overall quality of the products we love to munch on.
Can you explain the significance of pH levels in soil for plant growth?
The pH level of soil plays a vital role in plant nutrition by controlling the availability of nutrients. Most plants prefer a pH range of 6 to 7.5. Veering too far from this sweet spot can impede a plant's ability to absorb the goodness it needs from the soil.
Why is monitoring and controlling pH levels vital in pharmaceutical products?
When it comes to pharmaceuticals, pH is particularly important because it can influence the stability, solubility, and absorption of medications in the body. That's why a tonne of research goes into ensuring that the correct pH is just right for these products.
How does pH influence our daily lives beyond our own biology?
Outside our biology, pH is so important for a host of daily activities. From the perfect balance required to maintain clear and non-corrosive water in our pipes to the effectiveness of cleaning products and even the health of aquatic life in our oceans, pH is everywhere, making sure things tick along nicely.

Taking Root Cuttings: Advice from a Pro

taking-root-cuttings-advice-from-a-pro

Taking Root Cuttings: Advice from a Pro

Below is a step-by-step, insightful guide to taking root cuttings. It comes from a veteran no-till grower who takes around 200 cuttings a week. This method has been described as fail-safe and is appropriate for both small and large-scale growing environments. The method covers the first 10 days till the cuttings have rooted.

Required Items

  • Large high dome propagator
  • Jiffy 7 peat pellets
  • Scalpels
  • Clonex
  • Spray bottle
  • Round pot saucer-200-300mm
  • Ph Pen and solutions
  • 1L measuring jug
  • Surgical spirit and cotton balls
  • 200w blue CFL

Cuttings need to be taken from a healthy mother plant. This is essential to the success of the cuttings.

Day 1

The measuring jug needs filling with water heated to 25 degrees and a ph. of 5.5. This can then be poured into the round pot saucer, picked for its ideal depth.

10 x jiffy pellets should be added next, over 30 seconds they will expand soaking up the water. The open side of the jiffy pellets should be facing up.

Once full expanded, remove the jiffy pellets one by one, squeeze out excess water and place on to the propagator tray.

Next, all 10 jiffy pellets should be removed and skewered all the way to the bottom of the jiffy. A metal kebab skewer is suitable for the task. After that cuttings can be taken.

Where to cut

IMPORTANT: USE A CLEAN BLADE

Be sure before you take a single cut that any implement, be it scalpels or scissors are wiped down with surgical spirit. Taking the cutting will leave an open wound on the plant and could easily infect it. Consider using a different blade for each mother plant and avoid reusing blades to stave off cross-contamination.

Use clean sharp scissors to take the cutting from the mother plant. The ideal location to take from is the ‘the crown’ if taking small amounts of cuttings. If taking a larger number of cuttings from various sources of the plant, start from the top and work your way down.

Cut the branch of the mother plant at a 45-degree angle. You want at least 3 nodes on the cutting. Cut the lower leaves flush to the stem leaving the leaves at the top (crown). If your cutting has any large fan leaves then these should be trimmed. This will stop the cutting from wilting and you can also fit more cuttings into the propagator.

Scratch And Dip

Once 10 cuttings are at your disposal, the preparation of scratching and dipping them can begin. Take a cutting and make a clean 45-degree angle cut at the base of a stem with a scalpel. Scratching the bottom 20mm with the scalpel’s edge will stimulate hormone production. Dip the bottom of the scratched cutting into Clonex. Once well coated place into the jiffy, ensuring it is placed firmly. Close up the top off the jiffy by pressing it closed.

As soon as all the cuttings have received this treatment, they require spraying with room temperature water. Ideally, the water would be between ph 5.5 and 5.8. Do not forget to also spray the inside of the propagator dome. Cuttings thrive in humidity and it is one of the strongest stimulants for their growth.

The dome should then be placed over the cuttings, under fluorescent light with the vents closed. Place the light 500mm above the propagator. The light cycle for the cuttings should mimic the mother plants, i.e. 18hrs for the mother plant, 18hrs for cuttings etc. Consistency is the key.

Day 2 and 3

For best results, 3 times a day, remove the dome and spay its insides and the cuttings with water.

Day 4

Once again, spray the inside of the dome and the cuttings but open the vents. Enabling the moisture to escape from the propagator will dry the jiffy’s forcing the roots to search out for moisture.

Day 5

At this point, jiffy’s should be dry to the touch. Add 250mm of water at a ph. of 5.5 into the tray. Be sure to not add water to the top of the cuttings, we want the roots to search for it which will grow and strengthen them in the process. The cuttings should never be allowed to sit in excess water. If come 2 hours there is any excess, remove with paper towels or a syringe.

Day 6

This is the day to bring back the humidity. Close the vents on the propagator, spray the cuttings and the dome twice on this day.

Day 7

Around half of the cuttings should be showing roots coming through. Spraying the dome and cuttings should be done twice a day still, with the vents remaining closed.

Day 8 and 9

The business end of the process: come Day 8 all your cuttings should be showing roots. Add 250mm of water at a ph. of 5.8 and a half strength formulex. Vents should be kept closed and sprayed with water once across these two days. The roots will double in size across the next 12 hours.

Day 10

Take off the dome. This allows the cuttings to acclimatize to a normal environment. This will begin the process of ‘hardening’ the cuttings. If the cuttings appear to be wilting to begin with this is perfectly routine, do not be alarmed. Your cuttings are now ready to be transplanted when you please.

Mother Plant Care Guide: Cultivating Robust Plants

mother-plant-care-guide

Mother Plant Care Guide

Have you ever wondered how gardeners and growers manage to produce multiple plants with desirable traits, all consistent in quality and performance? Enter the mother plant, a central figure in the propagation world, offering a dependable source of high-quality clones. Essentially, a mother plant serves as the genetic blueprint for new plants, or clones, that are genetically identical to her. I'll guide you through the intriguing process of mother plant propagation, from selecting the right candidate to nurturing and taking cuttings.

Understanding the imperatives of mother plant care is crucial for any grower aiming to sustain a garden's legacy. Whether you're a hobbyist or a commercial cultivator, the techniques I'll share are designed to help you keep your mother plants healthy and productive. Plus, you'll learn how to harvest cuttings effectively, ensuring these offspring live up to their genetic potential. This article isn't just about instruction; it's about delving into the life cycle of these vital plants, examining their genetics, phenotype, and the intricate growth cycles they go through.

Key Takeaways

  • A mother plant is foundational for cloning identical offspring with consistent attributes.
  • Proper selection, care, and cutting techniques are essential to keep a mother plant healthy.
  • The article offers a comprehensive guide on nurturing and leveraging mother plants.

What Is A Mother Plant?

Imagine I've found the perfect plant in my garden - lush, healthy, and just the kind of specimen I want to replicate. I'd designate it as my mother plant. Why? Because this is my superstar plant from which I can create clones—little carbon copies that share the exact genetic makeup. It's like hitting the jackpot in plant genetics!

The Magic Of Cloning

For us gardeners, cloning isn't a sci-fi concept; it's pure garden magic. When I take a cutting from the mother plant—usually a strong stem with a few leaves—and coax it into rooting, that young clone will grow with the same characteristics: if Mum's got sweet-tasting fruit, so will her offspring. This method means I can have a whole garden of my favourite variety without shelling out extra dough or waiting ages for seeds to sprout.

Generations Of Green

What kinds of plants can step up as a mother plant? Honestly, nearly any! From herbs to flowers, and even fruits or vegetables. The key to growing mother plants is keeping them in a vegetative state, where they're focused on leafy growth rather than blossoming into the next stage of their life cycle. This ensures a steady supply of cuttings.

Here are some brief facts about mother plants:

  • Genotypically Gifted: They are the original plant with the desired genotype.
  • Vegetatively Vital: Kept in a non-flowering, vegetative state for continued cloning.
  • Diverse Dynasties: Can be any plant—herbs, fruits, or flowers.

Next time you're admiring a particularly splendid plant and wishing you could fill your space with its twins, think of the mother plant technique—nature's first 3D printer!

Why Keep A Mother Plant?

So, what is the secret to a bountiful and consistent garden year-round? Well, I'm delighted to share that the answer might just be in nurturing a healthy mother plant. Not only does she become the backbone of your garden, but she also ensures a perpetual harvest, a dream for every grower.

Advantages Of A Mother Plant

  • Genetic Consistency: The offspring from a mother plant are clones, meaning they'll inherit her traits. In the context of cultivation, this translates to preserving the desired potency, flavour, and aroma.

  • Cost-Effectiveness: Instead of purchasing seeds or new plants repeatedly, I can snip cuttings from the mother plant, saving quite a bit of money. Over time, this significantly reduces costs for me and my fellow growers.

  • Healthy Cuttings: A robust mother plant gives rise to vigorous cuttings. This leads to an increase in the yield of the harvest as the plants grow strong and healthy.

  • Reduced Risk: By controlling the environment around one single mother plant, I dodge the bullet of pests and diseases, which are often a threat when introducing new plants from outside.

Community And Experimentation

It's heartening to swap cuttings with fellow gardening enthusiasts. It fosters a community spirit and lets us explore different plant varieties. Moreover, I get to experiment with various growing methods on these consistent cuttings, refining my green thumb.

Testimonials often underscore that mother plants tend to be the unsung heroes. For instance, a seasoned grower reported a substantial improvement in both the quality and quantity of their harvest after transitioning to a mother plant system.

So, whether you're a hobbyist or a professional, considering a mother plant could well be your ticket to a more fulfilling and fruitful gardening experience. Why not give it a shot and watch your garden thrive under your care?

Selecting Your Mother Plants

When I'm picking out mother plants, it's vital to look for ones with the best genetics and robust health to ensure the same quality is passed to their clones. Here's my approach to making that all-important decision.

Criteria For Selection

Strain: The strain is the starting point; I aim for those with a reputation for their desirable traits, be it flavour, aroma, or resin production.

Phenotypes: Opt for a healthy plant with stable and known phenotypes. This guarantees uniformity among the plant's clones.

Growth Rate and Yield: A mother plant needs to have a strong growth rate and a high yield. More vigorous plants tend to produce more cuttings, and that's what I'm after.

Resistance To Disease: I always choose a plant that's highly resistant to pests and diseases. Trust me, it's easier than dealing with sickly clones down the line!

Seeds vs Cuttings: I usually ponder if I should grow from seeds or use cuttings for predictable genetics. Both have their merits, and it often comes down to what's available and legal.

Legal Considerations: It's crucial to be aware of the legalities around plant cloning, especially with patented strains, so I make sure to do my homework.

Sensory Experience: Aroma and flavour matter. I look for mother plants that have the sensory profile I want my clones to exhibit.

Labelling: To stay organised, I label everything meticulously, from the initial seedlings to the final picks. Monitoring each plant's growth and comparing notes help me determine the best one.

Evaluation: The evaluation phase is all about comparisons. I assess my options on a set standard of criteria and keep what works for me and my garden.

Decision Time: Making the pick isn't always easy, but once I spot that resilient, high-quality plant with the characteristics I favour, I know I've found my mother plant. It's a rewarding moment!

When you select a mother plant it can set the foundation for a successful crop. It's a bit like selecting an Olympic athlete to parent the next generation of champions – pick the best, and you'll be set up for success!

How to Grow A Mother Plant: Step By Step Guide

In this guide, I'll walk you through the critical steps to successfully maintaining mother plants. We'll cover the right environment, important nutrition, the perfect light conditions, and training techniques to ensure your mother plant thrives.

Choosing The Right Environment

Creating the optimal environment is like setting the stage for a winning performance. My grow space must be controllable for factors like temperature and humidity. Ideal temperatures range between 22-26°C, with humidity sitting comfortably around 60% during the vegetative state. It's essential to choose a growing medium, be it soil, coco coir, or a hydroponic setup. Remember, soil should be rich and well-draining, while coco requires regular feeding since it lacks nutrients.

Nutrition And Feeding Schedule

Feeding a parent plant is not unlike crafting a gourmet dish—the right ingredients make all the difference. A balanced feed containing nitrogen, potassium, phosphorus, calcium, and magnesium supports vigorous growth. I keep an eye on the pH level, aiming for a slightly acidic environment around pH 6.0 for soil or 5.8 for hydroponics. My feeding schedule doesn't sleep on the job; I adhere to a consistent routine that supplies liquid fertilizers every other watering to avoid overfeeding.

Lighting And Photoperiod

Light is life, and for my mother plant, the veg light serves as the sun around which its world revolves. I ensure at least 18 hours of light daily to keep mother plants in a vegetative state, using full-spectrum LED lights or MH (Metal Halide) bulbs for efficiency and effectiveness. This photoperiod signals the plant to grow rather than flower, which is exactly the right amount of light for a mother plant.

Training Techniques

Training my mother plant is where I channel my inner gardener-sculptor. Techniques such as topping, pinching, and bending allow me to shape the plant to be bushier and promote more branching, which in turn provides more cuttings. It's not about brute force but gentle persuasion, encouraging the plant to grow in the direction and shape that I want without overstressing it.

By following these detailed steps and maintaining a delicate balance between discipline and care, growing a successful mother plant becomes an incredibly rewarding experience.

Caring For Your Mother Plants And Clones

When you embark on the journey of nurturing mother plants and their subsequent clones, you're committing to a craft that blends art with science. The vitality of your clones hinges on the well-being of the mother plant, so attention to detail in pruning, feeding, and pest control is paramount.

Pruning And Maintenance

Pruning is essential for promoting a bushy growth structure and ensuring vigorous clones. It will also keep the plant in good health. I always start with sterile equipment to prevent disease transmission. Topping the plant — cutting the main stem above a leaf node — encourages lateral growth and more sites for cuttings. Between stages of vigorous growth, pinching out the tips of new growth helps to establish a fuller shape. Regular defoliation is also important; removing older, lower leaves improves airflow and light penetration.

Maintenance involves more than pruning. I root my cuttings in a well-aerated medium like coco coir, which promotes healthy root development. For robust veg growth, I ensure my mother plant's environment stays between 20-25°C with relative humidity around 60-70%. I feed her a balanced diet rich in nitrogen, potassium, calcium, and magnesium, with consistent pH levels to keep nutrient absorption optimal.

Pest And Pathogen Prevention

My mother's plants are precious, so I'm always on guard against pests and pathogens. Inspecting the plant regularly is my first line of defence; the sooner I spot trouble, the better. I prefer to keep my grow area impeccably clean and implement good airflow to prevent stagnant, humid conditions where pests thrive. Introducing beneficial insects can sometimes help, as they prey on common pests like spider mites and aphids.

If I do encounter pests or fungal issues, I reach for organic solutions first, such as neem oil or a mild soap solution. Over the years, I've learned that the key to pest and pathogen control is to act swiftly but thoughtfully, avoiding harsh chemicals that could harm the plant or the efficacy of future clones. Decisive, informed action can save a mother plant from infestations which could otherwise spell disaster for both her and her clones.

Taking Cuttings From The Mother Plant

Have you ever wondered how to create clones of your favourite plants? Taking cuttings from a mother plant is a simple and efficient way to do just that. The process can yield identical offspring which preserve the mother plant's genetics. To increase your chances of successful rooting, follow these steps.

First off, when should you take cuttings? It’s best done early in the morning when the plant is full of moisture. Now, let’s get down to the nitty-gritty:

Step 1: Preparation Prepare your tools – you’ll need sterile scissors or a sharp blade. Sterility is vital to prevent any disease transmission.

Step 2: Cutting Identify a healthy branch and cut at a 45-degree angle. This particular angle increases the area available for rooting.

Step 3: Rooting Gel Dip your cutting into a rooting gel. This step is not mandatory, but a rooting hormone can significantly improve your success rates.

Step 4: Media Selection Choose your media. Your options range from rockwool cubes to peat pellets – it needs to be moist and well-aerated.

Step 5: Environmental Control Maintain a controlled environment using a propagator to uphold high humidity and stable temperatures.

Step Action Tip
1 Sterilise cutting tool. Isopropyl alcohol is a convenient steriliser.
2 Cut the branch at 45 degrees. Sharp tools make cleaner cuts for better rooting.
3 Apply rooting hormone. Rooting gels are cleaner and easier to use.
4 Insert into media. Ensure the media is pre-moistened.
5 Control the cuttings' environment. Propagators with vents can help manage humidity.

Remember, patience is key! It may take several weeks for your cuttings to root properly. You can improve your success rate with a heating mat beneath your cuttings to encourage growth. Avoid direct sunlight; instead, opt for gentle indirect light. Before you know it, you’ll have baby plants all ready for potting on!

The process is incredibly rewarding and simpler than you might think. So go on, give it a try! Who knows, you might just get hooked on expanding your plant family.

Conclusion

In mastering the art of cultivating mother plants, I've found it both rewarding and strategic, particularly for sustaining a consistent quality of harvest. By maintaining these plants in a vegetative state, I've ensured a steady supply of clones, mirroring the mother's robust genetics. The three key attributes of cultivating mother plants are:

  • Consistent Quality: Mother plants serve as a blueprint, allowing home and commercial growers to replicate their best genetics.
  • Economical: Growing from clones reduces the need for purchasing seeds, saving a considerable amount of money in the long run.
  • Efficiency: With clones, the guesswork from seed germination is eliminated, speeding up the growing process.

As a grower, I can attest to the growth advantages of using a mother plant. My clones transition to the flowering stage remarkably well because they're genetic copies of a proven, high-quality plant. This reliability translates to peace of mind and more predictable yields.

To sum up, a well-cared-for mother plant is at the heart of any fruitful cultivation cycle. Both home growers and commercial operators benefit greatly from the plant's ability to produce numerous, identical offspring. It's a tried and tested method that contributes to a garden's success, improving not just the growth but also the harvest quality. Embracing this technique will transform your growing experience, and I'm confident it will elevate your gardening endeavours.

Mother Plant Care Guide FAQs

How can one select the ideal candidate for a mother plant?
When I'm looking for the perfect mother plant, I ensure it's a healthy specimen with robust growth, free from diseases and pests. My preference is a plant with a strong root system and vigorous vegetative growth, as it often yields the best cuttings.
Could you explain how a mother plant contributes to propagation?
Certainly! A mother plant serves as a donor for cuttings or clones. These cuttings, when rooted properly, develop into new plants that are genetically identical to the mother, helping me preserve the desired traits of the original plant.
What are the key care tips for sustaining a healthy mother plant?
To keep my mother plant thriving, I focus on providing optimal lighting, proper watering, and regular feeding with balanced nutrients. Additionally, maintaining the right temperature and humidity is crucial for its overall health.
In what ways do mother plants impact the quality of their cuttings?
The health of a mother plant is directly proportional to the quality of its cuttings. I've observed that a well-cared-for mother plant produces more vigorous and robust cuttings, which in turn have a higher success rate during propagation.
How often should a mother plant be replaced to ensure the best propagation results?
I usually replace my mother plant with a new mother, every few years. If I notice a decline in vigour or if it becomes too woody, the plant is ready to retire. This ensures that the cuttings remain high-quality and the propagation success rate stays high.
Can you detail the procedure for taking cuttings from a mother plant?
When taking cuttings from a mother plant, I use a clean, sharp pair of scissors or a knife to make a cut below a node. I then remove the lower leaves and dip the cutting in rooting hormone before placing it into a suitable growing medium, ensuring a better chance for the rooting to occur.

Introduction to Hydroponics: A Beginner's Guide

Introduction to Hydroponics

As someone with a keen interest in innovative gardening methods, I've always been fascinated by hydroponics. This soil-less form of cultivating plants involves using nutrient-rich water to grow a wide variety of crops. What's truly exciting is the versatility it offers—whether you're an urban dweller with limited space or you have acres at your disposal, hydroponics can be tailored to fit. It's a method well-suited for indoor and outdoor growing, with the added perk of not being dependent on the whims of the weather.

In hydroponic systems, plants are often nestled within inert mediums like sand, gravel, or perlite, which help support the roots and aid in the even distribution of water and nutrients. The precise environmental control is not just appealing; it's revolutionary. Gone are the days of battling soilborne pests or diseases, as the closed design of a hydroponics system significantly reduces these risks. Moreover, artificial lighting systems ensure that regardless of natural light availability, plants receive the optimal wavelengths for photosynthesis.

Key Takeaways

  • Hydroponics is a versatile, soil-less plant cultivation method.
  • It allows for precise environmental control and can be used both indoors and outdoors.
  • It can reduce pest risks and is not dependent on natural light sources.

What Is Hydroponics?

Ever wondered if plants can thrive without the familiar brown earth they're typically nestled in? Well, they can through hydroponics! It's a soilless culture, where I let the plants' roots bathe directly in water rich with essential nutrients. Instead of soil, roots absorb a tailored nutrient solution that fuels their growth, much like a gourmet meal for the plants.

The name 'hydroponics' sounds pretty futuristic, doesn't it? It's coined from the Greek words hudor (water) and ponos (work) – literally meaning "water-working". Fancy growing some vegetables, herbs, or flowers without getting your hands dirty? Hydroponically, it's not only possible but popular.

Here's a quick rundown of the setup. Plants are supported in an inert medium, think rock wool or coconut coir. This medium is like the armchair for the plants – comfy but not nutritional. The real magic is in the water circulating beneath, a cocktail of minerals like nitrogen, phosphorus, and potassium, along with a bunch of others like sulfur, magnesium, and calcium.

So, growth is one thing, but the benefits? Hydroponics uses less water than traditional gardening, a real win for our thirsty planet. Plus, say goodbye to weeding! But it's not a free lunch; balancing the nutrient solution, ensuring ample oxygen supply, and managing water usage is a bit of a tightrope act. The balance must be right or you'll soon face consequences.

My purpose here is to give you the scoop on this ground-breaking way to cultivate plants. It's not just about ditching the soil; it's about reimagining cultivation. Stay tuned, and I'll walk you through the ins and outs of various hydroponic systems, the nutrients that make your plants swoon, and how to tackle common hiccups along the way. 

Indoor vs Outdoor Growing

When I think about the magic of growing plants, a few key points sprout up immediately: the type of environment our leafy friends will call home and how it differs depending on whether they're basking in the sun or chilling out indoors.

Indoor Growing Advantages

Having my plants indoors means I've got the reigns on the environment. The control over temperature, humidity, and light is unmatched. Fancy grow lights mimic the sun, providing my greens with their essential photosynthesis fix. Space isn't an issue, either; a small room can turn into a garden! Plus, less water is used compared to traditional soil gardening. The icing on the cake is higher yields – I've seen that plants are often happier and healthier under my watchful eye.

Outdoor Growing Benefits

Now, for a breath of fresh air, let's talk about taking the hydroponic system outside. My wallet breathes a sigh of relief with the lower costs and maintenance. It's a more natural and organic experience, leaning on good old Mother Nature to run the show. I'm not just growing plants; I'm crafting ecosystems with natural pollinators and helpful predators. And let's not forget the reduced energy usage – eco points for outdoor growing!

Considerations for Setup

There's a fair bit to mull over when setting up. Indoors, I factor in the cost of gear, from containers to lighting systems. Space planning is critical – I go Tetris mode fitting everything perfectly. Outdoors, it's all about location; finding that sweet spot where my plants can thrive with adequate sunlight and protection.

Hydroponic vs Soil Cultivation

Hydroponics vs soil – it's like comparing a space-age station to a quaint cottage garden. Soil's great for nostalgia, but hydroponic systems can lead to higher yields and better water usage efficiency. The clincher? No soil means saying goodbye to many soil-borne pests and a cheerio to weeding.

Grow Medium Choices

Let's put on our gardening hats and talk grow mediums. Options abound, from rockwool to perlite, vermiculite to gravels, even sandy dunes or clay pellets could become a plant's new home. Each has its perks. Rockwool, for example, boasts excellent aeration, which gets the plants cracking on growing.

Types of Hydroponic Systems

There's a smorgasbord of systems out there. The wick system is the carefree cousin, simple and effective. Need a little more va-va-voom? Try the ebb and flow or get speedy with the nutrient film technique. High rollers might dig the aeroponics, where roots hang out in the air like they just don’t care.

Monitoring and Maintenance

My inner geek loves this bit. It's all about pH levels, nutrients, and water levels. Fancy gadgets help me monitor, from pumps to aeration systems, all playing their part to keep the greens, well, green. Timing’s a biggie too – keeping an eye on when to feed and when to let the plants sip their water cocktail is key to happy hydroponics.

Growing plants really is a brilliant slice of life, whether indoors with high-tech setups and full command over the climate, or outdoors where the elements have their say. 

Environment Control

When I'm nurturing my hydroponically grown plants, I pay extra attention to their environment. Temperature plays a huge part, doesn't it? I've found that my plants thrive when the temperature hovers between 18°C and 26°C. Too hot or too cold and they either slow down or become overactive, negatively impacting their growth and nutrient uptake. To keep things steady, I use a mix of heaters, fans, and sometimes air conditioners — talk about climate control!

Now, humidity – that's another story! Aim for a sweet spot between 50% and 70%, because plants need to perspire too, right? But if there's too much water in the air, they get "sweaty" leading to less transpiration and potential fungal issues. That's where my trusty humidifiers and dehumidifiers come into play, helping to balance the moisture level in the air.

Oh, and let's not forget about pH levels. Those are crucial. We're talking about the pH sweet zone of 5.5 to 6.5 for my greens. I use pH meters and adjusters to dial in that perfect acidity level. Otherwise, nutrients can play hide and seek — present, but not available to my plants.

Finally, there's EC or electrical conductivity. Just for the record, 1.0 to 2.0 mS/cm is the range I aim for. It's like a nutrition meter, telling me how many nutrients are swimming around in the water. It's measured with EC meters, and I adjust my nutrient solutions based on what it tells me.

Here's a quick reference table I put on my wall:

Factor Optimal Range Control Methods
Temperature 18°C - 26°C Heaters, fans, vents
Humidity 50% - 70% Humidifiers, dehumidifiers
pH 5.5 - 6.5 pH meters, adjusters
EC 1.0 - 2.0 mS/cm EC meters, nutrient adjustments

Remember, consistency is key in hydroponics. Small changes make big waves, so keep an eye out and your plants will thank you!

Lighting Systems

When I think about hydroponics, the first thing that comes to my mind is water. But, let me tell you, lighting is just as crucial. If you're keen on getting those plants to perform photosynthesis indoors, you're going to need some top-notch artificial lights. After all, no light, no life, right?

HID (High Intensity Discharge) Lighting

HID lighting, my friends, is like the powerhouse of grow lights – truly brilliant for those of you aiming to go big in the hydroponics game. These lights are champs at churning out high volumes of light, rather efficiently I might add.

  • Metal Halide (MH): Boldly blasting a blue-white spectrum, MH is perfect for spurring on the vegetative growth that leafy greens adore. And they keep on shining, offering about 10,000 hours of light. 
  • High Pressure Sodium (HPS): If you're looking for blooms, HPS lights with their warm red-orange hues are your best mates. Great for the flowering and fruiting stage, these bulbs stick around for an impressive 18,000 hours.

Just a heads-up though, these lights do turn up the heat and might make a bit of noise – they're not the quiet types. Plus, they come with extra kit like ballasts, reflectors, and you'd probably need a cooling system unless you fancy a sauna.

CFL (Compact Fluorescent Lamps)

I like to think of CFLs as the friendly neighbours of the lighting world – not too intense and great for a cosy indoor setup. If you're starting a small-scale hydroponic project or fancy a bit of a hobby – these are your go-to lights.

  • Efficiency: While they're less ambitious in terms of light output, CFL lamps win at being cool-headed, as they don't heat up your space much.
  • Spectrum: Emitting a full spectrum, they're particularly chummy with seedlings, clones, and herbs. And with a lifespan of 10,000 hours, they're no short-term fling.

Plus, you can pretty much plug and play with these, as there's no need for heavy-duty installation or cooling systems. Keeps things nice and simple, doesn't it?

LED (Light Emitting Diode)

Picture the Swiss Army knife of lights – LEDs. Whether you're running a giant hydroponic farm or just dabbling with a few pots, LED lights fit the bill. They're the virtuoso of versatility with a tailor-made light spectrum for whatever plants you've got.

  • Efficiency: These little diodes are amazing at turning electricity into light with minimal waste – your energy bills will thank you.
  • Lifespan: Fancy a light that lasts for about 50,000 hours? LEDs have got you covered; that's a serious commitment to your green babies.
  • Heat: Don't worry about them raising the temperature either, as LEDs are pretty cool customers, and they won't disturb the peace with noise.

Whether you've got seedlings or mature plants, LEDs cater to all stages of growth, which is pretty nifty if you ask me.

So, whether you're a seasoned grower or just dipping your toes in the waters of hydroponics, picking the right kind of lighting is key to getting those plants to thank you with growth and bounty. Just remember, it's all about finding the perfect match for your setup. 

Hydroponics

Now, let's talk about methods of hydroponics. There are advantages and disadvantages to the different systems used to grow in water. This technique maximises water usage, prevents diseases, and allows for cultivation in regions where traditional farming is a no-go.

Getting Started with Hydroponics

Fascinated by the idea of starting your own soil-free garden? You’ll initially need seeds or seedlings, a growing medium to support your plants (like perlite or coco coir), and a reservoir for the nutrient solution. Ensuring the correct pH levels and water temperature is paramount for optimal growth. Think about germination and nutrient delivery as your first steps to a thriving hydroponic garden.

Maintaining Your Hydroponic Garden

Once your seeds sprout, maintaining the right levels of dissolved oxygen and nutrients in the water becomes a daily dance. Regular checks of pH and nutrient concentrations are essential, and maintaining a successful hydroponic system’s reliability through disease control and balancing economic factors will keep your garden productive.

Scaling Up

Considering taking your hobby to a commercial level? Commercial hydroponics allows for yield maximisation through methods like vertical farming. Global trends hint at a burgeoning market – NASA's use in agricultural research implies potential and hydroponic farming definitely plays into the sustainability narrative, contributing to food security, especially in urban areas.

Challenges and Solutions

Every garden has its pests, and hydroponics faces its unique set of challenges. System reliability, disease control, and economic factors can deter newcomers but fear not, solutions abound from technological advances ensuring stable, productive, and green systems.

Now, let's dive a bit deeper into how different hydroponic systems work:

  • NFT (Nutrient Film Technique)

    1. Advantages
      • Efficient in water and nutrients usage.
      • High quality crop yields.
    2. Disadvantages
      • Sensitive to power outages and similar failures.
  • Flood and Drain (Ebb and Flow)

    1. Advantages
      • Great for a range of plants.
      • Good aeration for roots.
    2. Disadvantages
      • Can consume more water.
  • Drip Irrigation

    1. Advantages
      • Precise nutrient delivery.
      • Adaptable for various plants.
    2. Disadvantages
      • Prone to clogging.
  • Aeroponics

    1. Advantages
      • Roots get maximum supply of oxygen.
      • Promotes rapid growth.
    2. Disadvantages
      • Technologically dependent.
  • Deep Water Culture (DWC)

    1. Advantages
      • Simple to set up and inexpensive.
      • No need for timers.
    2. Disadvantages
      • Challenges changing water.
  • Aquaponics

    1. Advantages
      • Yields both plants and fish.
      • Reduces water waste.
    2. Disadvantages
      • Balancing the aeroponic system can be challenging.

Hydroponics isn't just another way to grow your basil. I’d say it's a potential cornerstone for our future food supply. 

Conclusion

Reflecting on our exploration of hydroponics, we've uncovered a method of cultivation that ditches traditional soil, instead harnessing a nutrient-rich water solution to grow plants. The advantages? It's an effervescent promise of conservation, saving up to 90% more water than conventional farming.

Let's roll up our sleeves and give hydroponics a whirl ourselves. You might wonder, "Where do I even begin?" Well, it's simpler than you might think:

  • Get savvy with the basics: Understand the key components such as nutrients and growing mediums.
  • Choose your system: Whether it's Wick or NFT, all Hydroponic tenchiques have their pros and cons.
  • Monitor closely: Keep tabs on pH and nutrient levels to ensure your plants thrive.

I invite you to chart your own course into this watery world of roots and nutrient solutions. Seeking further enlightenment? There's a wealth of resources out there for the curious mind—books, online forums, and community workshops.

Introduction to Hydroponics FAQs

What exactly is hydroponics and how does it differ from traditional soil gardening?
Hydroponics, simply put, is the art of growing plants without soil. Unlike traditional gardening, my green friends get their nutrients from a water solution, and that's a real game-changer. 
Could you shed light on the primary benefits of using a hydroponic system over conventional methods?
Sure thing! With hydroponics, I've noticed up to a staggering 90% less water use compared to old-school gardening. There's also no weeding needed—a win for my back and my schedule. Plus, hydroponics can offer faster growth rates and yields, but remember, it does require a more controlled environment.
What are the most suitable growing mediums for a hydroponic setup?
In the realm of hydroponics, you'll find various growing mediums to cradle plant roots. I’ve seen rockwool, clay pellets, and even coconut coir step up to the plate. Each one ensures my plants aren’t just hanging in the air, giving roots a much-needed support structure.  
Which plants thrive best in hydroponic systems, and are there any particular varieties that are recommended?
Leafy greens and herbs are the rock stars of hydroponics, comfortably basking in their nourishing baths. Lettuces, basil, and mint love this setup. But listen, I've also had success with tomatoes and strawberries, who seem equally thrilled to join the hydroponic bandwagon.
How does one begin with hydroponics, especially for someone completely new to the concept?
Getting started is simpler than it might seem. I began with a basic kit, learning to balance the pH between 5.5 to 6.5 and aerating the water with an air pump for content roots. Starting small and scaling up as you learn the ropes is my go-to move.
Can you elaborate on the fundamental principles that underpin hydroponic gardening?
Absolutely! At its core, hydroponic gardening relies on a nutrient-rich water solution, allowing us to bid farewell to soil. Plants get their food directly from this solution, and it's fascinating to watch them thrive under such meticulously managed conditions.

How Does Deep Water Culture Hydroponics Work: DWC Explained

How Does A DWC Hydroponic System Work

In the realm of hydroponic growing, DWC, or deep water culture, has taken a front seat due to its simplicity and efficiency. Now, what exactly is a DWC hydroponics system? Think of it as aquatics for plants where, rather than swimming, they thrive in a nutrient-laden aqueous solution without a speck of soil. It's a form of water culture hydroponics, one among the six primary categories, characterised by roots being suspended in water rich in nutrients and oxygen.

This water-based haven for roots is the crux of how a DWC system operates. By ensuring the roots make constant contact with the nutritional solution, complemented by ample oxygen provided by an air pump and air stone, plants access everything they need for growth directly from the water, bypassing the need for soil.

Imagine us as chefs in a kitchen, concocting the perfect blend of ingredients for our green guests. The article we've put together serves up hearty portions of information you need about setting up your own DWC system, balancing nutrients and pH, and troubleshooting common issues. DWC systems bring forth a myriad of advantages such as faster growth and less maintenance, but like all methods, they come with their own set of challenges.

Key Takeaways

  • DWC hydroponic systems allow plants to grow in water enriched with nutrients and oxygen.
  • Setting up a DWC system involves a container, water-nutrient solution, air pump, and air stone.
  • Maintenance includes nutrient and pH level management, as well as regular water changes.

What Is DWC Hydroponics?

Deep Water Culture (DWC) is a remarkably simple and efficient form of hydroponics. It's all about letting the roots take a dip! In a traditional DWC system, the plant's root system sits in a nutrient-rich bath. How does this magical bath work? It's a savvy dance between a few key components:

  • The Reservoir: It holds our main act, the nutrient solution, which is just water jazzed up with essential plant nutrients.
  • Air Pump & Air Stone: Together, they form air bubbles, providing oxygen to the roots. This oxygen isn't just for a bit of fun; it's vital for healthy growth.
  • Net Pots and Growing Medium: You don't have to worry about soil! These little pots and media keep the plants stable while allowing roots to plunge freely into the watery depths below.

Talking to you, fellow growers, here's the lowdown on the roots' underwater adventure: As the air pump sends bubbles of oxygen through the water via the air stone, the roots suck up the good stuff — oxygen, water, and nutrients — in a non-stop party. It's like an all-you-can-eat buffet for plants!

While DWC growing sounds revolutionary, it's one type of system in a group of hydroponic techniques. Others like ebb and flow, the nutrient film technique, aeroponics, drip, and wick systems all have unique ways of feeding plants — but DWC keeps it uncomplicated. Here's a bonus for you: DWC isn't picky about the guest list. A variety of plants like lettuce, spinach, kale, and herbs such as basil and mint thrive in these systems. Even the heavy eaters like tomatoes, peppers, and strawberries love a good DWC setup. 

Benefits Of Deep Water Culture

how-does-a-dwc-hydroponic-system-work-1

In our exploration of Deep Water Culture hydroponics systems, we'll discover how this method of growing can revolutionise our approach to hydroponics with its noteworthy benefits.

Rapid Plant Growth

Ever wished for a garden that grows at an almost magical pace? With DWC, this is more than just a wish. Our plants enjoy fast growth due to continuous access to oxygenated water and nutrient-rich solutions. This constant care means a robust root system that doesn't need to search hard for its sustenance, which can often accelerate growth compared to traditional soil gardens.

Higher Yields

We're all after abundant harvests, and DWC systems deliver just that: higher yields. Imagine the satisfaction when we reap more than we sow, all thanks to the efficiency of the DWC setup. The plants have direct access to nutrients 24/7, leading to not only faster growth but also larger produce. In fact, some gardeners have noted they can harvest up to twice as fast as they would from soil-based plants.

What Makes DWC Stand Out:

  • Simple & Cost-efficient: Setting up a DWC system might seem futuristic, but it's far from complex. It's both simpler and more cost-effective in the long run compared to other hydroponic systems.
  • Low Maintenance: Once you've got it going, DWC pretty much looks after itself. A low-maintenance dream, right?
  • Water & Nutrient Savings: We recirculate the hydroponic nutrient solution in DWC, which means we're using a smaller amount of water and nutrients. Isn't it great when we can be resourceful and still get fantastic results?
  • Less Pests & Diseases: Without soil, the risk of pests and diseases is significantly diminished, giving us one less thing to worry about.
  • Complete Control: Fancy having more say over your growing environment? DWC hands us the reins, allowing us to tweak conditions to our heart's content.

By incorporating DWC into our growing systems, we're setting ourselves up for a future of plentiful, healthy harvests with fewer headaches along the way. It's a straightforward, resourceful, and bountiful approach to modern gardening.

Disadvantages Of Deep Water Culture

While Deep Water Culture (DWC) systems boast numerous advantages, they also come with their own set of drawbacks that we should consider. Let's dive into some challenges you might encounter with DWC and discuss how to mitigate them.

Monitoring and Maintenance

A constant supply of electricity is vital for DWC systems, as they rely on equipment like air pumps to oxygenate the water. Power outages or equipment malfunctions can spell disaster, leading to crop failure if not addressed swiftly.

  • Prevention tips: Consider investing in a backup generator or UPS (Uninterruptible Power Supply) to guard against unexpected power cuts. A timer can help regulate the system's electrical components, reducing the wear and tear on equipment.

Additionally, maintaining the optimum pH, temperature, dissolved oxygen, and nutrient levels is crucial. These factors can fluctuate, requiring frequent monitoring to ensure plant health.

  • Helpful tools: Stay on top of things with a pH meter, water chiller, dissolved oxygen meter, and Total Dissolved Solids (TDS) meter. These devices will assist in maintaining a consistent and healthy environment for your plants.

Risk of Algae Growth

Stagnant water in DWC systems can lead to the growth of algae, which competes with plants for nutrients and can lead to root rot and nutrient lockout.

  • Combating algae: To curb algae growth, use a light shield to block light from entering the nutrient solution. Regularly adding a hydrogen peroxide solution can help oxygenate the water and suppress algae without harming your plants.

Remember, keeping an eye out for these challenges and employing preemptive measures can go a long way in ensuring the success of our DWC hydroponic system.

How Does A DWC Hydroponic System Work?

First, let's list what's needed: a reservoir, air pump, air stone, tubing, a drill with a hole saw, net pots, a suitable growing medium, seeds or seedlings, water, and hydroponic nutrients. Got everything? Brilliant!

Here's our step-by-step:

  1. Prepare the reservoir: Drill holes in the lid to snugly fit your net pots.
  2. Nutrient mix: Fill the reservoir with water and stir in hydroponic nutrients, following the directions on the label.
  3. Oxygenate: Connect the air pump to the air stone using the tubing, submerge the stone in the water, and let those bubbles flow.
  4. Planting: Pop your growing medium into the net pots. Bury those seeds or nestle the seedlings in nice and cosy.
  5. Submerge the roots: Place the net pots into the holes on the reservoir lid. The plant roots should just touch the water.
  6. Light it up: Position the reservoir in a well-lit area or under grow lights.

Keep an eye on the water level and adjust nutrient concentration as your plants drink up. This simple system lets plant roots soak up all they need directly from an oxygen-rich, nutrient-laden water bath, thanks to our trusty air stone churning out oxygen. If you’re a visual learner, certainly hunt down a couple of illustrative videos or diagrams for a clearer picture. They’ll show you exactly how each part comes together to create an efficient oxygenated environment for your plants to thrive in. So, there we are! Our garden isn't constrained by soil, and neither are we. Our DWC system is a passport to hassle-free, bountiful harvests.

How Often To Change Water In DWC?

how-does-a-dwc-hydroponic-system-work-2

We’re often asked about the do's and don'ts of maintaining a pristine Deep Water Culture (DWC) system, such as how frequently we should swap out the water to keep our leafy friends happy. Let’s break it down.

Importance of Regular Water Changes

Changing the nutrients and water in our DWC system isn't just about being tidy – it's crucial. Doing this regularly prevents nutrient depletion, salt buildup, pH fluctuations, the dreaded root rot, and algae from throwing a party in our system.

Guidelines for Water Change Frequency

  • For small reservoirs or if you're cultivating fast-growing plants: Once every 7 to 10 days
  • When dealing with large reservoirs or slow-growing varieties: Once every 2 to 3 weeks
  • If you’ve got a recirculating system with a pump and filter working overtime: Once every 4 to 6 weeks

Factors Influencing Water Change Frequency

Several factors come into play when considering how often to change our hydroponic water:

  • The size and number of plants and the reservoir capacity
  • The type and quality of the water and nutrients we're using
  • Environmental factors like temperature and humidity
  • pH and TDS/EC readings – make sure these are in check!

Tips for Changing Water Safely and Efficiently

Here’s a quick how-to for changing your DWC water:

  • Drain the old water: using a siphon, a pump, or good ol' buckets.
  • Clean your reservoir: net pots, air stone, and tubing with water and a touch of mild bleach solution to avoid unwelcome microbial guests.
  • Refill with fresh water: mix in hydroponic nutrients as per the label’s handshake (wink to our bottle instructions there).
  • Measure and adjust: pH and EC/TDS with a reliable meter.
  • Before sealing it back up, check our plant's roots are having a splash in the water.

Remember, these are just pointers – keep an eye on your system and listen to what it’s telling you. 

Variations Of DWC

In the world of DWC hydroponics, we're not stuck with just one way of doing things – far from it! Let's dive into two specific variations that have been tailor-made to maximise plant happiness and yield.

Recirculating DWC

Recirculating DWC system, or RDWC for short, is all about efficiency. In this growing method, we use a water pump to move the nutrient solution between different reservoirs connected to multiple plants. It's like a communal swimming pool for your plants, where everyone gets to share the good stuff. Recirculating Deep Water Culture is particularly ace if you're scaling up, as it ensures a consistent environment for all plants, which is crucial for their growth.

  • Pros: Equal distribution of nutrients; better for larger setups.
  • Cons: More complex setup; potential for issues if one plant gets sick.

Bubbleponics

Right, let's talk about Bubbleponics, a cheque technique for hydroponic gardeners. Picture this: your nutrient solution doesn't just sit there; it's delivered directly to the base of the plants like a VIP service. This is all thanks to a water pump and a top-notch drip system. It's like your plants are sipping cocktails by the water—only the cocktail is a nutrient-rich solution!

  • Pros: Direct nutrient delivery; faster growth in the initial stages.
  • Cons: A tad more hands-on; equipment may need regular checks.

Now, we've given you two solid options that can kick your hydroponic adventure up a notch. Have fun with them, and watch your plants thrive!

Growing Plants in DWC

Deep Water Culture or DWC, is a method of hydroponics ensuring plants have everything they need at their rooty fingertips. Ever wondered if you could grow a veggie feast without soil? With DWC, it’s not just possible, it’s also pretty straightforward.

Suitable Plants for DWC

Let's chat about what plants can grow in our DWC system. Believe it or not, lettuce ranks high as an aquatic superstar; it just thrives in these watery depths. Similarly, leafy greens like spinach come out lush and flavourful. Want more variety on your plate? Add some herbs, strawberries, and peppers to the mix; they absolutely love a good hydroponic session.

Best Bets for DWC
Lettuce
Leafy Greens
Herbs
Strawberries
Tomatoes
Peppers
Spinach

For those of us with a penchant for Italian cuisine, a DWC setup can also grow tomatoes, but let's give them a sturdy support structure, as they can get a little rambunctious. 

Starting From Seeds

Right, let's get down to business with seeds. First off, grab some rockwool cubes. These little wonders are brilliant for getting your seeds off to a cosy start. Make sure to soak the rockwool in pH-balanced water before you introduce your seeds to their new homes; we’re not barbarians, after all. To kick off germination, pop one or two seeds into each rockwool cube and wait for the magic to happen. You don't need a huge setup; a small tray can house dozens of these cubes.

Once those green shoots peek out and say 'hello', it's time to move them to the DWC system where they can spread their roots. Keep an eye on your seedlings as they transition; they'll need some tenderness, care, and good old-fashioned nurturing. But before long, you’ll see them grow with gusto in their watery abode, ready to be fawned over and eventually, make their way to your plate. How rewarding is that?

Nutrients and pH Management

Just like us, plants need a balanced diet to thrive. We'll take a look at the two key aspects that keep our green friends happy in DWC hydroponic systems: nutrients and pH levels.

Optimum Nutrient Concentration

It's crucial to mix a nutrient-rich solution with the exactness of a gourmet chef. If we get the mixture just right, our plants will gobble up those nutrients effectively. A golden standard to aim for is a nutrient concentration that supports robust plant growth without going overboard. Depending on the growth stage, leafy greens often prefer an EC (electrical conductivity) value from 1.2 to 2.0 mS/cm, with nutrient levels adjusted accordingly.

  • Seedlings/Cuttings: low to moderate concentration
  • Vegetative Stage: increased concentration
  • Flowering/Fruiting Stage: highest concentration

Keeping an eye on the water level is key because as water evaporates, the nutrient concentration can inadvertently spike.

Maintaining pH Balance

And fancy a bit of chemistry? pH levels are paramount since a slight shift can turn a nutrient solution from a gorgeous gown to an unwearable wetsuit for the roots. We're looking for the sweet spot, typically a pH range from 5.5 to 6.5, where nutrients are most available to plants. Here's where a pH control kit comes in handy. It usually packs both pH up and pH down solutions because pH levels love to waltz around. By regularly testing and tweaking:

  1. Test: Check pH with a simple test kit.
  2. Adjust: Use pH up or pH down if needed.
  3. Stabilise: Wait, retest, and adjust as necessary to keep those pH fluctuations in check.

And let's not forget, water temperature affects pH as well—best practice is keeping it between 18-22°C (nice and cosy, not too hot or cold for our plant pals). By managing these aspects diligently, we set the stage for a successful harvest, making every effort in our DWC (Deep Water Culture) hydroponic system truly worthwhile.

Setting Up Your Own DWC System

When we talk about creating a home for our plants through DWC hydroponics, remember we're providing them with a simplified spa experience. Imagine their delight as they hydrate and breathe in a luxurious bubble bath of nutrients. Fancy setting one up? Here's how we can get our hands dirty—in the cleanest way possible!

Choosing the Right Equipment

Deciding on the kit for our DWC hydroponics is a bit like picking out a new smartphone. We want efficiency, reliability, and a lovely array of features to bolster our plant's growth. Here are our essentials:

  • Air Pump: Just as fish need a bubbler, our DWC system must have a solid air pump. Oxygen is the breath of life for hydroponically grown plants.
  • Air Stones: These are the unsung heroes that work with the air pump to distribute oxygen evenly through the water in the form of fine bubbles.
  • Water Reservoir: Be it a simple bucket or a large bin, this is the space where our nutrient solution and plants will live.
  • Net Pots: These little baskets snugly cradle the roots of our plants and keep them suspended in nutrient-filled nirvana.
  • Hydroponic Nutrients: These specially formulated nutrients ensure our plants get all the necessary minerals to go from seedling to superstar.
  • Growing Medium: Sterile and pH-neutral media, like LECA (Lightweight Expanded Clay Aggregate) pebbles, support our plants and help to transport nutrients to the roots.

To check the environment's quality, we’ll need a pH meter and a TDS (Total Dissolved Solids) meter. It's like having a personal health check-up for our plants, but without the anxious waiting for results.

DIY DWC System

Ready to build our own DWC system from scratch? Here's the basic blueprint we can follow:

Step 1: Gather our materials and components. This includes everything listed above. Brace yourself for some DIY action!

Step 2: With our water reservoir picked out, we'll need to carefully mark and make holes in the lid just big enough for the net pots to snugly fit through. We should see only the roots pass through—not the entire pot dropping in.

Step 3: Transform plastic pots into net pots by creating holes in the sides and bottoms. These should be large enough to allow roots to freely pass through but small enough to keep the growing medium in.

Step 4: Prepare the LECA pebbles by rinsing them clean. We're paring down the natural habitat to its most pristine never-touched-by-nature condition.

Step 5: Place our humour-loving air stone at the bottom of the reservoir, connect it to the air pump, and let it bubble away to its heart’s content.

Step 6: Pop our plants in their net pots, pamper them with the prepared growing medium, and lovingly place them into the holes we created in step 2.

Once we've checked the pH levels and adjusted the nutrient solution, our DIY DWC system is a green light for growth! The simplicity of air stones gurgling and roots basking in nutrient glory is almost poetic, isn't it? Plus, the gratification of DIY — nothing beats that hands-on triumph.

Conclusion

In this journey, we've navigated the waters of Deep Water Culture (DWC) hydroponic systems with you. At its core, DWC hydroponics is a method that ensures plant roots are submerged deep in an oxygen-rich water nutrient solution, promoting rapid growth and lush yields, especially for leafy greens and herbs.

What Makes DWC Hydroponics Stand Out?

  • Simplicity: The simplicity of the DWC system makes it a fantastic choice for beginners looking to dip their toes into hydroponic cultivation. Even those of us without a green thumb can find success.
  • Efficiency: Commercial growers appreciate the efficiency DWC systems offer - providing excellent results without complex setups.
  • Oxygenation: A central reservoir equipped with an air stone ensures the nutrient solution remains in aerated water, which is vital for healthy root systems.
  • Scalability: Whether it's a single bucket or an expansive array of modules, DWC systems can scale to match your aspirations in growing.

Let's not forget the disadvantages, though. Monitoring is crucial; temperature shifts or system failures can quickly turn a thriving garden into a wilted disappointment. It calls for our vigilance and care.

Now that we've covered the essentials, it's clear DWC hydroponics offers a fusion of ease and productivity. We triumphantly conclude that it presents an efficacious way to cultivate a bountiful harvest, whether you're sprouting your first seedling or nurturing an entire greenhouse. Let's celebrate our newfound knowledge and the potential it unlocks for greener, more efficient futures!

Ready to get your hands wet? Dive into DWC hydroponics and watch your garden flourish!

How Does Deep Water Culture Hydroponics Work FAQs

What steps are involved in setting up a deep water culture system for optimal plant growth?
Setting up your DWC hydroponic system involves several key steps. We need to ensure we've got a reservoir filled with a nutrient solution and that there's a means for introducing ample oxygen to the roots, typically using an air pump and air stone. The light source should be adequate for your plants to photosynthesize properly.
Could you share how frequently the water should be changed in a DWC hydroponic setup?
For a thriving DWC system, we should replace and refresh the hydroponic water every one to two weeks. This helps prevent nutrient build-up and keeps our plants growing with the clean, nutrient-rich solution they love.
I'm curious, which plants have been found to thrive best when grown in a DWC hydroponic system?
Leafy greens like lettuce and spinach are stars in a DWC system. Herbs also flourish wonderfully. Generally, non-root, faster-growing plants do brilliantly and want to grow with this method.
For those just starting, what are the key considerations for maintaining a deep water culture hydroponic system?
As beginners, we need to keep an eye on our nutrient levels and pH balance—it's vital for our plants' health. Also, maintaining the right water temperature and cleanliness cut down on diseases and nutrient issues.
How long, on average, does it take to harvest plants using a DWC hydroponic method?
Harvest times can vary, but many leafy greens are ready to harvest in about 4 to 6 weeks when grown in a DWC system. The type of plant and growing conditions will influence the exact timing.
Can you outline the process of how a DWC hydroponic system nourishes plants from seed to harvest?
In a DWC system, we start our seeds in rockwool cubes until the seedlings develop roots. Then, submerged in the nutrient-rich water of the DWC system, plants are nourished directly as they grow. An air pump provides oxygen to the roots, essential for growth until it's time to harvest.